How to Change Fonts on Squarespace: A Step-by-Step Guide
Fonts are usually the first design element that people notice on a website. The combination of fonts you use on your website will communicate the tone and mood of your brand - whether it’s sleek and professional or playful and creative. The way that fonts are used and applied on your website - for headings, paragraphs, buttons and links - all contributes to the overall vibe of your website.
Squarespace makes it really easy and straightforward to change the fonts on your website using their in-built font settings in Site Styles. The font settings give you a clear structure for maintaining consistency with your font selections across your website, which is important for a clean design and good user experience. There are over 1,600 native fonts in Squarespace, so there is definitely something for everyone. You can see my favourite Squarespace font pairings here.
Different Font Types
Serif
The fonts that have a small line or feet (called “serifs”) at the end of the letters. They feel classic, trustworthy and formal. Examples include Times New Roman, Playfair Display and Merriweather.Sans Serif
These are clean and simple letter forms without strokes at the end of the letters. They feel modern, minimal and friendly. Examples include Open Sans, Montserrat and Arial.Slab Serif
Slab Serif fonts have thick, slab like serifs. They’re not as delicate as regular serif fonts. They feel bold and powerful Examples include Rockwell and Zilla Slab.Script
These look like calligraphy or cursive handwriting. They feel romantic, decorative and expressive. Examples include Dancing Script and Allura.Display / Decorative
These are highly stylised and attention grabbing fonts for visual impact. They feel loud and artistic. Use display and decorative fonts for titles and headings only, not for body text. Examples include Bebas Neue and Lobster.Monospace
Every character in a monospace font takes up the exact same width. These fonts feel techie and minimal. Examples include Courier and Roboto Mono.
An Overview of Squarespace Font and Style Adjustments
All the font settings in Squarespace can be found in Site Styles. You can access Site Styles by clicking on the paintbrush icon at the top right hand corner in any editing screen. Once inside Site Styles, click on the arrow next to Fonts. From here you will see the following categories.
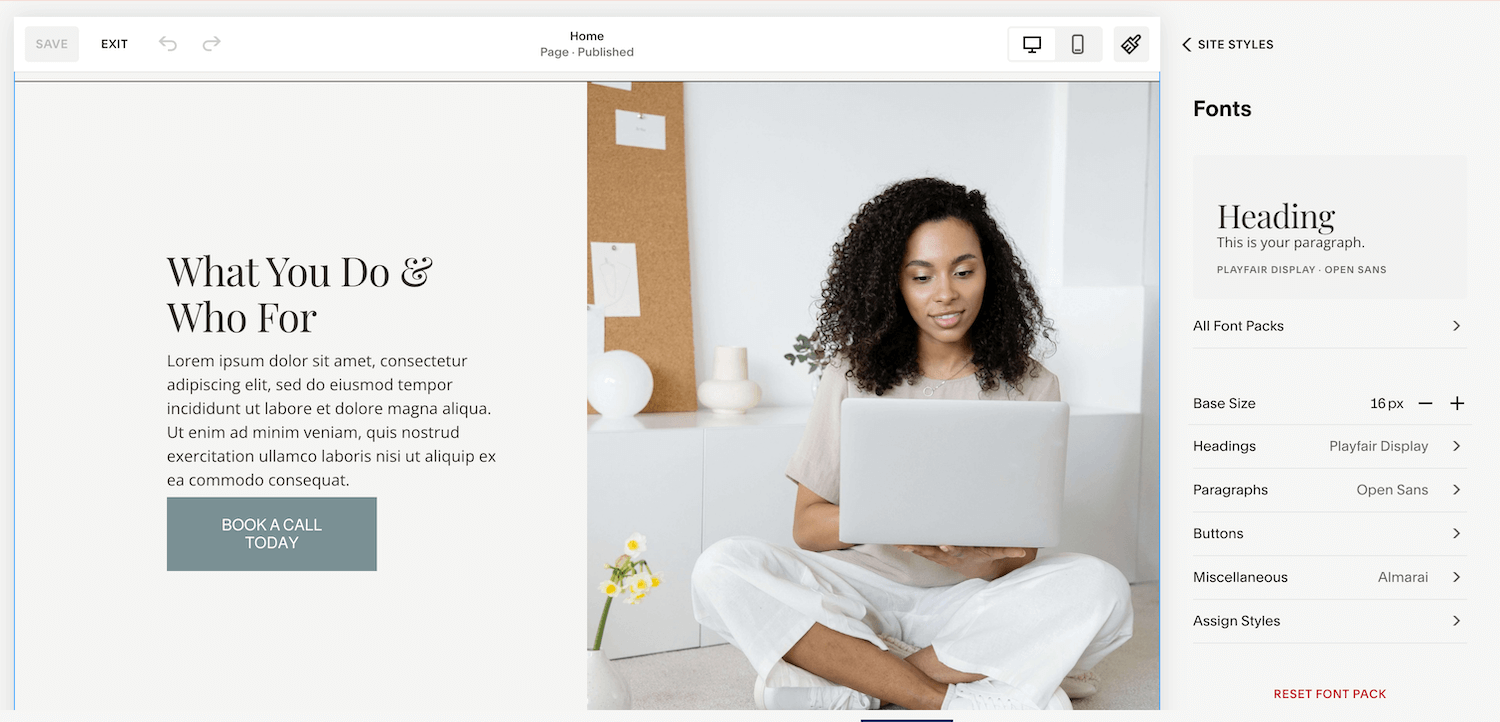
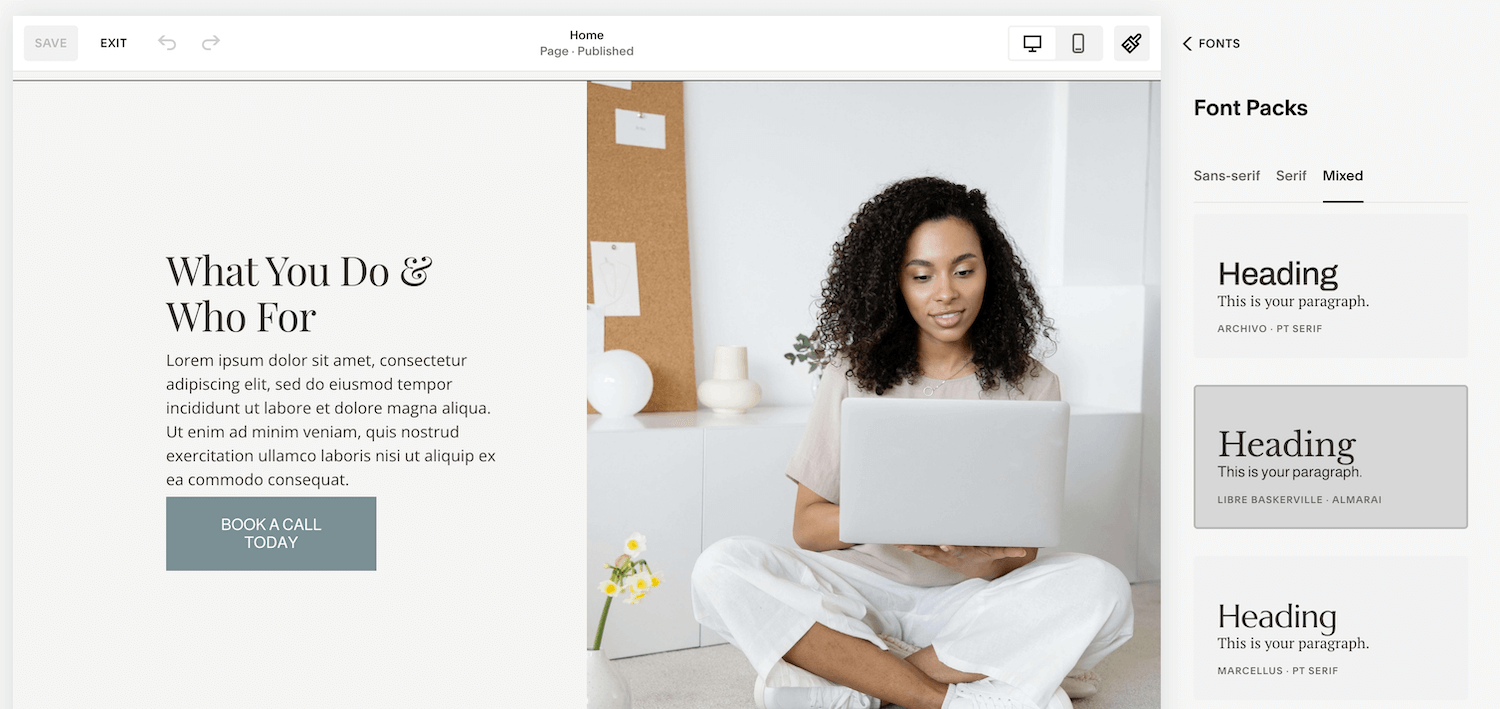
All Font Packs - The Font Packs in Squarespace are a great starting point if you don’t already have branding in place. Squarespace’s design team have put these together to give your website a polished look right away without the need to trawl through all the available fonts. You can choose from a combination of Serif, Sans Serif or Mixed.
Base Size - This is the foundational font size for the website and all the other text sizes across your website will scale from the Base Size. The default base size in Squarespace is 16px. When you adjust font sizes for headings, paragraphs and buttons across your website you will see the unit rem (short for root em). This means that the size is relative to your base size. For example, if your base size is 16px and you set a font to 2 rem then it would display at 32px.
Headings - There are a range of settings for Headings in Squarespace. Any changes to the settings here will apply to all the headings across your website, except for size. After selecting a base heading style, you can then set the sizes for Heading 1, Heading 2, Heading 3 and Heading 4. When you come to build out your website you can select which type of heading (h1, h2, h3 or h4) will apply in each text block you use. The settings for headings include:
Font Family - the style of font you want to use for headings e.g. Arial
Weight - the thickness of the letters. 400 is considered regular and 600 is considered bold.
Style - normal or italic
Line Height - the vertical space each line occupies
Letter Spacing - the horizontal space between letter in a line
Text Transform - uppercase, lowercase or capital letters
Size - the size of each heading level - h1, h2. h3 and h4.
Paragraphs - the settings for Paragraphs in Squarespace are the same as for Headings, but there are only 3 paragraph levels instead of 4.
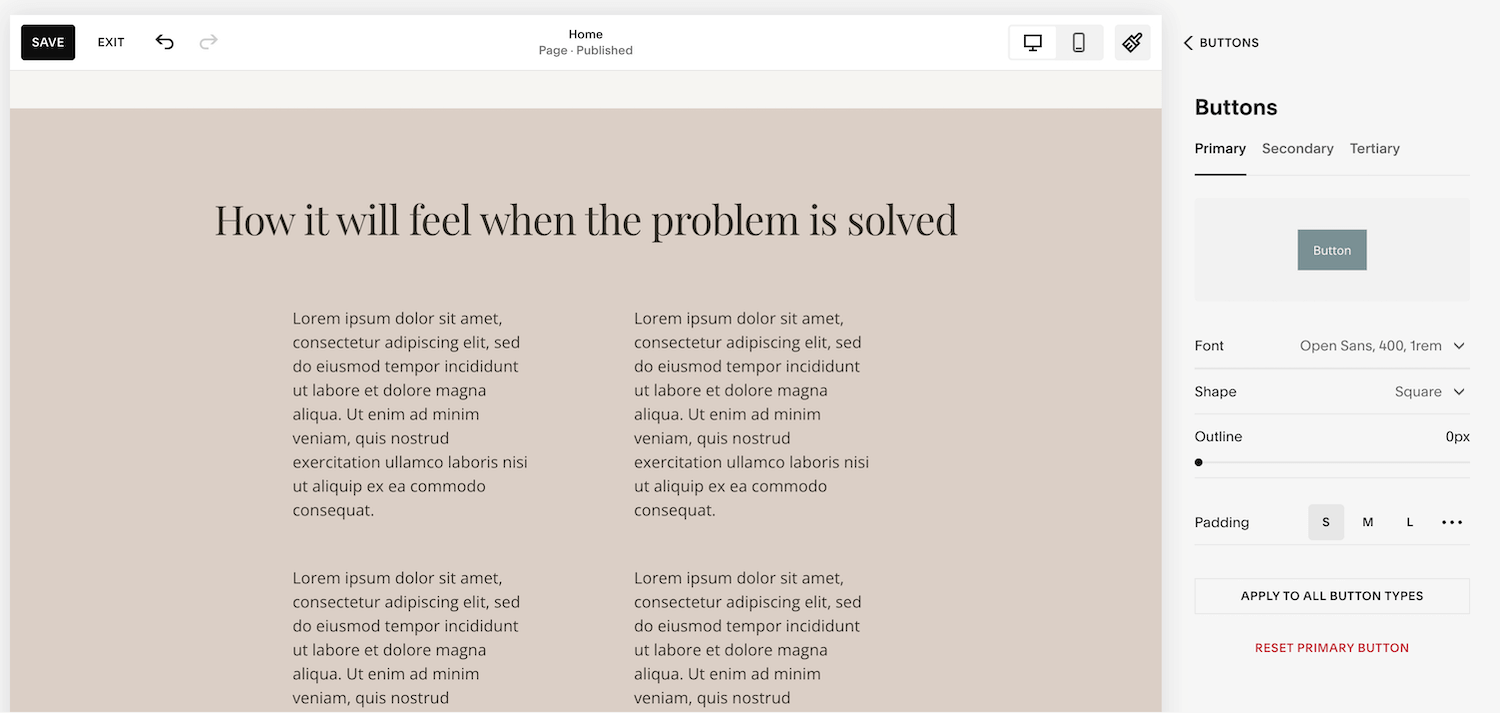
Buttons - You can customise the font styles for your Primary, Secondary and Tertiary button styles here within the Fonts panel. Other button settings such as colours and spacing are found in the Site Styles menu.
Miscellaneous - Fonts that are used in smaller areas of your website such as price tags can be adjusted here.
Assign Styles - This section allows you to assign the heading and paragraph styles that you have set to different parts of your website e.g. headers, blog posts, newsletter blocks, announcement bars etc. You can also assign custom font styles for these areas if you would prefer them to look slightly different to the rest of your website.
How to Change Fonts on Squarespace
Choose and Apply a Font Pack
This is the easiest way to assign fonts in Squarespace. The design team at Squarespace have curated over 60 Font Packs which all consist of 2 fonts that pair well together. Choosing a Font Pack will automatically assign your header, paragraph, button and miscellaneous fonts, giving your website a polished and cohesive look.
To apply a font pack follow these steps:
Go to Site Styles then Fonts
Click on All Font Packs
Choose from Serif, Sans Serif or Mixed
Select a font pack
2. Assign and Customise Font Styles
If you already have font styles in mind then there’s no need to choose a Font Pack. Instead, you can assign your own styles by doing the following:
Go to Site Styles then Fonts
Navigate through each section: Headings, Paragraphs, Buttons, Miscellaneous, and Assign Styles
Choose your font families, weights, styles, and spacing for each
You can see my favourite Squarespace Font Pairings here.
3. Adjust Font Sizes
Once you have set your font settings you can adjust the sizes for Header 1 to Header 4, and Paragraph 1 to Paragraph 3. Typically, Header 1 and Paragraph 1 will be the largest with the others getting smaller with each step. This creates a visual hierarchy and improves readability across your website.
Use rem units to adjust your font sizes as this ensures that the text will scale consistently off your Base Size.
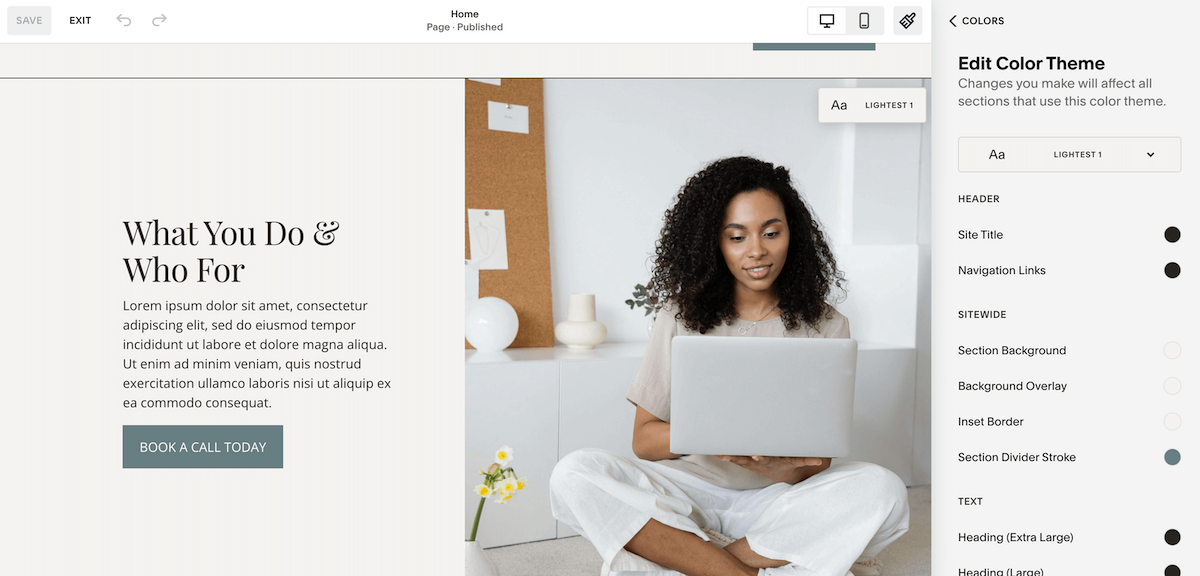
How to Change Font Colours in Squarespace
In Squarespace, there is a site-wide colour palette which consists of 5 core colours. These colours are then applied to predesigned colour themes throughout your website. The colour themes are called “Lightest 1”, “Lightest 2”, “Dark 1”, Dark 2” etc. Each theme allows for further customisations which means you can use as many colours as you like within different sections and blocks. I do recommend just sticking to the core 5 colours though as it creates a more cohesive look. Once each theme is customised and you’ve set your colours, those colour choices will apply whenever you apply a specific theme to a section.
How to Change Site Wide Colours in Squarespace
Go to Site Styles then Colors
Click Edit Palette
Input your 5 base colours. You can use HEX, RGC or HSL code.

How to Change Colours on Specific Blocks and Sections
Go to Site Styles then Colors
Choose the color theme you want to edit
Scroll down to the block or section type you’d like to change
Click the color circle next to that section and choose a new color from your palette - or click Custom to choose any other color
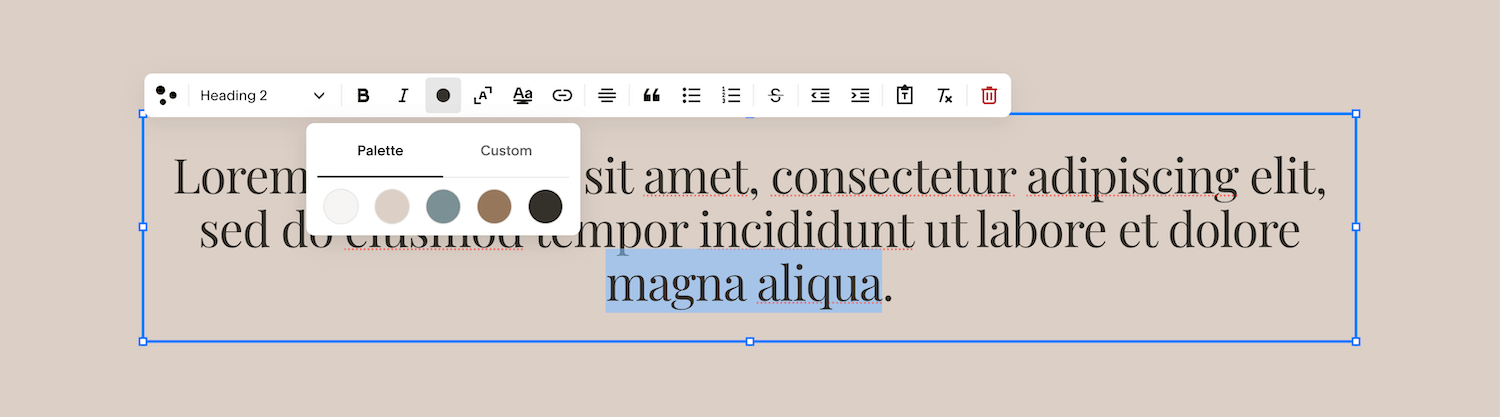
Changing the Colour of Individual Words or Text Segments Within a Text Block
For times when you want to manually highlight a single word or phrase with a unique color:
1.Click into the text block you want to edit
2. Highlight the word(s) you would like to change
3. Choose a color from your palette or a custom color
How to Change Fonts for Buttons in Squarespace
Buttons on a website are usually used for calls to action (CTAs) and should therefore stand out. Changing the fonts on your buttons can help the buttons stand out even more.
Go to Site Styles then Fonts.
Scroll down to the Buttons section.
Choose a different font, size, weight, or color for your primary, secondary, or tertiary button styles.
Ensure that your button fonts align with your site’s overall typography for consistency.
Using Custom Fonts in Squarespace
If you want to use a font on your website that isn’t native to Squarespace, you can do this using custom CSS.
Here is the blog post going through the process step-by step - How to Add Custom Fonts to Squarespace.
How to Change Fonts in Squarespace: The Bottom Line
Changing fonts in Squarespace is a relatively simple process, and with such a wide range of fonts to choose from, you really can customise the look and feel of your website to reflect your brand identity. Whether you use a pre-selected font pack or want to dive a bit deeper and change font sizes and colour schemes - it’s all very intuitive in Site Styles.
If you want to get started on your own website, I have a free template that you can customise to reflect your brand and showcase your business. The Essential Template has been designed with service providers in mind, and by following the steps in this guide you can start the customisation process by updating the fonts.
You can download The Essential Template here.
↓ Liked this post? Pin it to Pinterest ↓